

When surveying with RTK equipment, you will often need to do a localization to ensure that you are not only precise but also accurate (We have an article on the difference here: Surveying With RTK: What is the Difference Between Accuracy and Precision). Understanding how to perform a localization (also known as a site calibration or tying into control) is crucial in getting the most out of your equipment. Whether you are a surveyor, in construction, or have an engineering project, this process is critical in ensuring that you can get the results you need in the field. For those new to the field, it may seem complex, but understanding what it is, why it’s essential, and how to perform it can make the task much more approachable. This article will break down the concept of GNSS localization, provide insights into when and why it’s needed, and guide you step-by-step on how to perform it effectively. We also have a video on the topic!
What is a Localization in Surveying?
Why is a Localization Necessary?
When are Localizations Not Required?
How Do Your Perform GNSS Localizations?
Tips for Accurate GNSS Localization
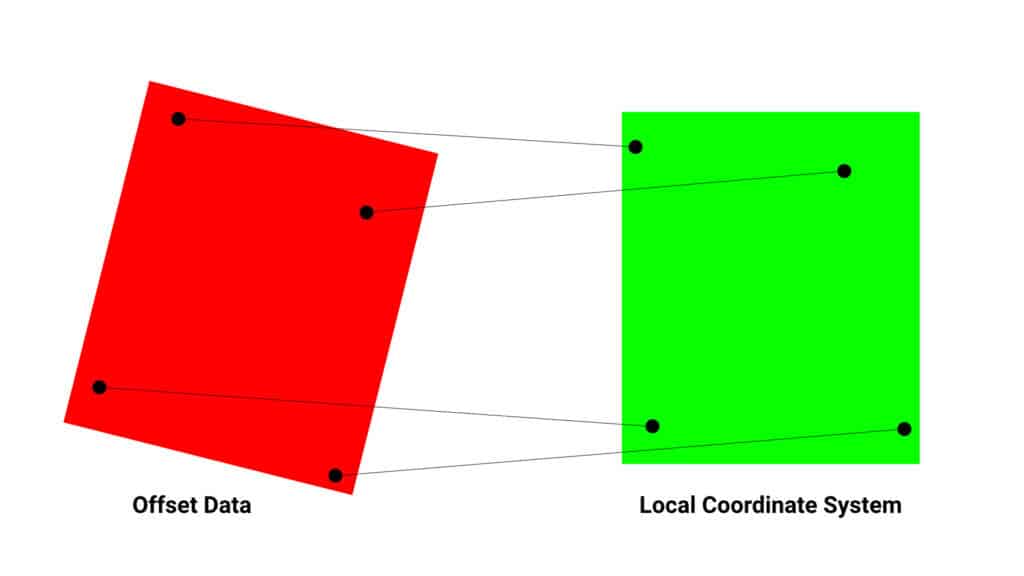
Localizations, sometimes referred to as local transformations or site calibrations, are the process of aligning GPS data with real-world or local coordinate systems. It ensures that the positions measured by your GNSS device correspond accurately to known control points in your job site or project area. Essentially, you are taking your receiver from where it thinks it is to where it actually is by associating point pairs of where your receiver thinks it is and where it actually is.
At its core, GNSS localization transforms satellite-derived positions (latitude, longitude, and elevation) into coordinates that match a specific coordinate system or local data set. Without this process, your GNSS data might appear offset from where you expect it to be, which can lead to significant issues in applications like surveying, boundary marking, or construction layout.
1. Bridging the Gap Between Surveys
When RTK receivers are setup on a project, they may not align with the local coordinate systems or site-specific systems. Previous surveys may have been performed with optical instruments, like total stations, or weren’t tied into the regional survey system when originally performed. Localization is therefore required when integrating GNSS data with pre-existing datasets, such as:
There are plenty of other scenarios where localizations are required, in essence, if your field data doesn’t match an existing data set, you probably need to perform a localization.
2. Minimizing Errors
One of the most common misconceptions about GNSS is that it will perfectly line up with your data immediately after setup. This is not the case. Some network-based solutions will tie into a regional or state coordinate system, but it may not be the system you need. On top of this if you are using an averaged based position (something we typically recommend in a lot of situations), you will have a 1-3 ft bust in your data. This can all be resolved by performing a localization.
3. Ensuring Project Accuracy
Localizations are particularly important for large-scale or high-precision projects where even small positional inaccuracies can have costly consequences. It ensures the GNSS data accurately reflects real-world positions, improving reliability and precision. On large projects especially, scale factors can play a huge role when attempting to determine the distance between points. Grid to ground scale factors can mean differences in hundreds of feet at those distances.
Localizations are not always necessary. If your task involves relative measurements, such as calculating distances or volumes within a self-contained dataset, GNSS localization may not be required. For example:
However, when aligning your data with real-world coordinates or another dataset, localization will still be required.
Although they can be difficult to wrap your head around, performing localizations is relatively straight forward.
1. Gather Your Equipment
To perform a localization, you will need:

2. Set Up Your GNSS Device
Start by setting up your GNSS receiver with an RTK fix. An RTK fix ensures high accuracy in positioning, which is essential for reliable localization. You can use either a network or UHF connection, it does not make a difference.
3. Identify Your Control Points
Locate the control points in your job area. You will need a minimum of one point, but extra points will improve the accuracy of the localization and reduce the change of error. These known points should, if possible:
4. Capture Data at Control Points
With your rover on a stable bipod or held as stable as possible, position it precisely over a control point. Follow these steps:
Repeat this process for each control point. The more control points you include, the tighter and more accurate your localization will be.
5. Pairing Your Points – Applying the Transformation
In order to perform the transformation, locate your known points and occupy them. After the occupation, associate the known coordinates with your GNSS observation.
6. Verify Accuracy
Once the transformation is applied:
1. Keep Your Control Points Encompassing the Job Site
Always ensure your project area is within the boundary of your control points. If your project extends beyond the control points, errors like skewing and distortion may occur. If you are working outside this area, ensure that you perform check shots or have a known point to check into.
2. Add Central Control Points for Large Projects
For expansive sites, think of the control network as a bed sheet stretched over the area. Pulling the sheet tight over the corners of the project does not necessarily mean the sheet is properly aligned in the middle of the bed. Adding a control point in the center helps “nail down” the sheet, minimizing sagging and improving accuracy.
3. Use a Bipod for Stability
A bipod allows you to plumb your rover over a control point with minimal movement, reducing errors. It also lets you take longer average shots without worrying about maintaining stability manually.
4. Avoid Inclined Planes Unless Necessary
When setting up your localization, disable vertical transformations on all points but the first. This simplifies the process, avoids inclined vertical planes and reduces potential errors.
5. Check Your Work
After completing the localization, always check one or two control points to ensure the transformation was successful. This saves you from discovering errors later when it’s too late to fix them. It is recommended to always leave at least one control point at the end that you have not tied into that you can check into.
GNSS localization are a fundamental process for ensuring the accuracy and reliability of GPS data in real-world applications. By aligning satellite-derived data with known control points, localization eliminates errors and ensures consistency with existing datasets.
For professionals in surveying, construction, and engineering, mastering GNSS localization is essential. By following the steps outlined above and applying best practices, you can confidently perform localizations, ensuring your projects are precise, efficient, and aligned with real-world requirements.
A GNSS localization, also called site calibration or local transformation, is the process of aligning GPS data with a local or real-world coordinate system. This ensures that your GNSS measurements accurately correspond to known control points, improving the precision and reliability of your data. It is crucial for projects where your work needs to match pre-existing datasets or real-world benchmarks, such as boundary surveys, construction layouts, or mining operations.
Localizations are necessary when:
– Integrating GNSS data with pre-existing surveys or site-specific coordinate systems.
– Working on projects like boundary surveys, construction layouts, or mining operations requiring alignment with known benchmarks.
– Accuracy and alignment with real-world coordinates are critical for the task.
They are not required for tasks involving only relative measurements, such as determining distances or volumes within a self-contained dataset.
To perform a localization, you will need:
– An RTK (Real-Time Kinematic) receiver with a fixed solution (e.g., Hemisphere S631 or Nano 7).
– Known control points with accurate real-world coordinates.
– A bipod or tripod to stabilize the rover for precise measurements.
– Survey software, such as FieldGenius, to manage and apply transformations.
Follow these tips for accurate localization:
– Use multiple control points surrounding and within your job site to minimize skew and distortion.
– Employ a bipod for stability during measurements to reduce human error.
– Turn off the tilt sensor to avoid tilt-induced inaccuracies.
– Add a central control point for large sites to prevent sagging in the middle of the control network.
– Verify the localization by checking a control point that was not part of the initial transformation.
– Failing to encompass the project site within the boundary of control points, which can cause skewing and inaccuracies.
– Ignoring the need for checkpoints to verify the localization’s accuracy after completing the process.
– Over-relying on inclined planes or vertical transformations, which can complicate the process unnecessarily.
– Skipping stability tools like a bipod, leading to imprecise measurements during data collection.
Bench Mark Equipment & Supplies is your team to trust with all your surveying equipment. We have been providing high-quality surveying equipment to land surveyors, engineers, construction, airborne and resource professionals since 2002. This helps establish ourselves as the go-to team in Calgary, Canada, and the USA. Plus, we provide a wide selection of equipment, including global navigation satellite systems, RTK GPS equipment, GNSS receivers, and more. We strive to provide the highest level of customer care and service for everyone. To speak to one of our team today, call us at +1 (888) 286-3204 or email us at [email protected]
